Okay, I know this blog is supposed to share how-to's, and to be honest I just lucked into this chandelier. A theater space tried to spray paint two crystal chandelier's black and sort of gummed them up. They were going to throw them away when a friend swooped in and got them for me. I re-rigged them with flicker bulbs [which you can get in large quantities for cheap on ebay] and hung it in the entryway. I guess the lesson here is, let people know you are looking for halloween decor and you will be surprised how many people will find it for you.
Wonderful, macabre, Halloween decorating ideas. Easy ways to turn your home into an elegant haunted mansion on a budget.
Saturday, September 29, 2012
Friday, September 28, 2012
The Lazy Way to Stunning Tombstones
After seeing some wonderful people spend incredible amounts of time making breath taking tombstones I decided I would do that too... Then I decided something good was on TV and forgot about it. But then I came back, like a Phoenix with one quest, to get the look they achieved with half the work. And now I am going to tell you haunters how.
These are cheap terrible tombstones I got from Party City. I wouldn't build an ice chest out of them, and yet they will be the foundation for your tombstones. Basically, we are going to use them for their carvings and build them out into a real, hearty tombstone.
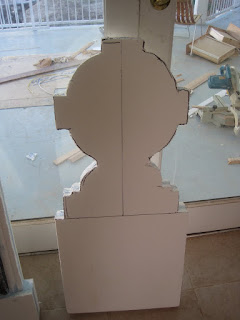
This is what we want to achieve. Start with 2 inch foam insulation. If the store has pink or blue foam use that, it is finer and so much easier to carve. If you are in California, like me, you will probably be regulated to good old beaded styrofoam. It's a little rougher and messier but we will make it work. Cut out a tombstone shape that echoes the shape of your cheap dimestore tombstone. You will need to double it to make the final tombstone 4 inches thick. Terra at Scary Lady Videos came up with a brilliant way to mount these tombstones to the ground: you will need to sandwich two sections of pvc pipe in channels between the two pieces of foam.
Later you can drive two pieces of rebar in the ground and then thread the tombstone over them with the pvc protecting the soft foam from the rebar poles. But back to the crafting!
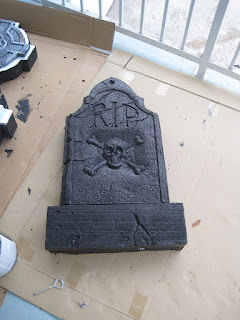
Use caulking gun foam adhesive to stick everything together. You can smooth out any joints and make sure it looks like one carved piece. I chose to build out the base a bit and add some 1/2" thick styrofoam I got from a packing box. To either side of the purchased tombstone I cut simple grooves with an angled box cutter against a straight edge. Little lines like this can help fill in blank areas and give your stone extra detail.
Here's another example of a fun shaped tombstone.
...and how it looked after I added my cheap Party City tombstone and built out a shelf and corner pieces from left over foam scraps. The cool etchings you see in the foam were made by spattering and drizzling acetone over it. [Be careful, a little acetone goes a long way and can eat all the way through the foam!]
Paint the whole thing with black exterior paint.
You will be shocked at how well painting the entire thing one color will mask that it is glued together from many different parts.
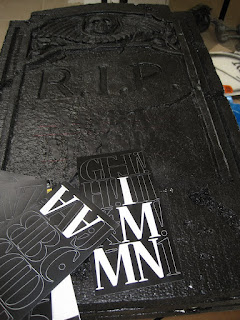
Now for a name. Real artists will carve or Dremel in a name. I chose the easy way and found these stick on letters. Align them to spell the name of the deceased. It doesn't matter what color these stick on letters are, we are using them to mask off areas. We will paint over them and remove them to reveal the black underneath.
Now sponge paint away! There is nothing like a fake sea sponge to give you a fake granite look. I just chose a plain grey, but a rose or dust color will work. When you like the look, remove the letters and if you choose, you can spray the whole thing with polyurethane to protect it.
Finished and mounted on the rebar. Each stands between 2.5 and 3 feet so they really have an imposing tombstone size at a fraction of the cost and of buying large professional looking tombstones. Now go make some and start scaring the neighbors!
Wednesday, September 26, 2012
Mortuary Chic
That's what I am calling my home this year. I want it to look like a Transylvanian funeral parlor. I made this last night. Look for old silver and gold candy dishes, soup tureens, even goblets can all be eerie looking vases. Then get a foam cube and start cramming flowers in. It's surprisingly easy and therapeutic. The cost of the tureen was $3 at a thrift store and there are about $25 worth of flowers in it from Michaels. [I feel like I should be doing their ads by now] Total cost: $28.
Tuesday, September 25, 2012
Cheap Creative Costume: Courtney Love
It's almost Halloween, you have nothing to wear, so you pull into the crowded parking lot of a closed Linens and Things that has now been retrofitted as a Halloween store. Looking down the aisles of pedestrian, unimaginative costumes you settle on one thinking, "Well at least it will be done." Minutes later you take the costume out of the bag only to find that it doesn't fit, is falling apart and you paid $80 for it. DON'T LET THIS HAPPEN TO YOU!
All the way up to Halloween day I will be posting cheap creative fun Halloween costumes that anyone can do. Starting with one of my favorites: Courtney Love.
It's the perfect costume for boys and girls, big and small, and even more frightening when there are multiple ones stumbling your direction. I started with a slip from a thrift store $5, bought the cheapest blonde wig in a bag from Walmart $8, added some barrettes, ruffled socks, black shoes and now I have a costume that gets attention all night. Especially when stumbling into strangers and yelling"F**k You!" at hedges that get in my way. To style the wig, start spraying it with hairspray right out of the bag. Gum it up. If it's too long, take out some office scissors and cut chunks out of it. You can't mess it up. For extra credit: use a Sharpie and create roots. Line your eyes and paint your lips red, then smear away! [She's probably been crying and eating a ham sandwich before she showed up at the party] Appropriate accessories are guitars, tiaras, and Frances Bean.
Total Cost: $13
Ring around the skully
Why should Santa be the only one to get his jollies with a holiday wreath? This was fast, easy and cheap. [insert your favorite off-color comment here] The black wreath was $8 from Michaels. They had eight skulls in a package and after drilling a few holes in the back of their heads and attaching them with craft wire, they are the perfect replacement for Christmas balls and pinecones. If you are not a sew-er [sew-er not sewer] just buy wire ribbon and make a bow for the bottom. However if you want the oversized haunted mansion bow you are going to have to make it. Here's how:
Start by cutting out two strips of your favorite halloween fabric 6' by 34" and sewing them into a sleeve with the side you want to show on the inside of the tube. [do not sew the 6' sides] A little fusible interfacing will give softer fabrics some heft.
Turn the sleeve inside out so that the right side now shows and loop it into a circle. This is the top of your bow. Sew the two ends together and then accordion crunch the middle together and secure by wrapping thread around it. This middle section will be covered up.
Make the tails in a triangular shape much the way you did the initial sleeve. Sew with the good side of the fabric together and then turn the tail inside out so that it shows. You do not need to sew closed the top [smaller] edge.
Situate the bow and the two tails together and secure them with thread. Then cover the whole messy center up with a 1 1/2" wide strip. Voila, you are done. Now gloat about it!
Monday, September 24, 2012
A VERY BAD THING: Zombie Projections
Martha can have her "good things." In this blog we celebrate some Very Bad Things. This is one of my favorites. Mark Gervais at HalloWindow has created some fantastically eerie projections to scare and delight your neighbors. For me it was as simple as hanging a cheap $5 frosted shower curtain liner and using a $40 hallogen bulb projector to create an endless conga line of zombies marching past my window. It also lets any real zombies know to keep stepping, this house is already inundated. Here is a video of the first year I did it. This time, I am going to iron out some of the wrinkles in the curtain before hanging.
Get a leg up.
Don't settle for cut rate morticians like poor Ophelia did.
Start checking craigslist now for mannequin parts. I got a torso, a posterior, three arms, various hands and this set of legs from a store that had random pieces that did not match. They basically gave them to me for 10 dollars and I am always finding a new fun haunt thing to use them for. For those concerned I will show how to make those tombstones in an upcoming blog. I may be stern... um
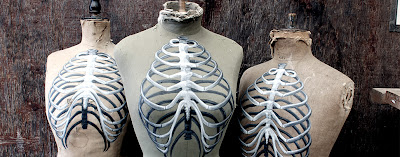
Well anyone concerned about LAs obsession on weight and figure can clearly see that reports are vastly overstated. I saw these at high falooting Halloween store and thought they were brilliant. Simple, elegant and once again, cheap. I just so happen to have an old dressing dummy so I made my own ribcage to pin to it. Feel free to print it out and make you own.
Flowers don't have to be pretty.
This was so easy to make I should be ashamed of myself... but of course I am not, I have no shame, I am Mister Horrorble. I began with an oversized foam skull I found at Michaels, on sale for about 10 dollars. It had a little trouble standing on it's own so I used Liquid Nails adhesive [although other foam approved adhesives would work] to glue the skull to a cheap glass candlestick I bought at the 99 cent store.
The flowers also came from Michaels, check your paper for coupons and sales on fall stems. All the flowers I used were 40% off. I may be Horrorble but I am still cheap. Them to help separate the flowers evenly, I drilled a patter of holes into the top of the skull.
Don't got too deep with these holes, you still want some foam resistance to hold the flowers in place. Then start building! Use wire cutters to arrange the flowers at different heights. Use as many or as few as you please [I liked the hat-like look these tall flowers gave but you could certainly cover the entire head.] Total cost of project : Under $25
Welcome Mortals!
Hello there. I am Mister Horrorble and I'm not very good at all, except when it comes to making good things bad. In this Halloween blog I will show you how to make the cheery, dreary... to haunt with musty dusty elegance and taste [bad of course]. This is Mister Horribles very bad ideas!
Subscribe to:
Posts (Atom)


