Sunday, February 23, 2014

ARGGGG! I'm a snazzy 80s business woman... NO, I'M A PIRATE!


Shiver me timbers.  It's a real live authentic pirate coat stolen from dangerous sea captain: Hook!? Morgan!?  Crunch!?  It is also a trendy 80s business woman's coat from Talbots.

Here's how I got from High Fashion, to High Seas!
To start with, take off the lapels, cut the collar a few inches below the shoulders and cut from that line directly down to the bottom of the jacket.
It's a good idea to serge or zig zag this edge so that it doesn't pull apart or fray.

Now find a fun material to add a 16 inch extension along the bottom.  Velvet, upholstery material, or this quilted satin that I used are all great choices.  Measure the bottom edge of the jacket and create a double sided panel.   With ribbon, add military points and accents, it's always easier to do these before it's sewn on the jacket.    


Attach the extension to the bottom of the coat and measure from the collar to the middle of the extension for the lapel length.  These you definitely want to decorate before adding to the coat.  Don't go overboard with expensive trim, I did all the designs on this coat with two kinds of ribbon and some buttons.

Attach the lapels with the right side sewn to the inside of the jacket, flap them over and... Holy Davy Jones Footlocker!


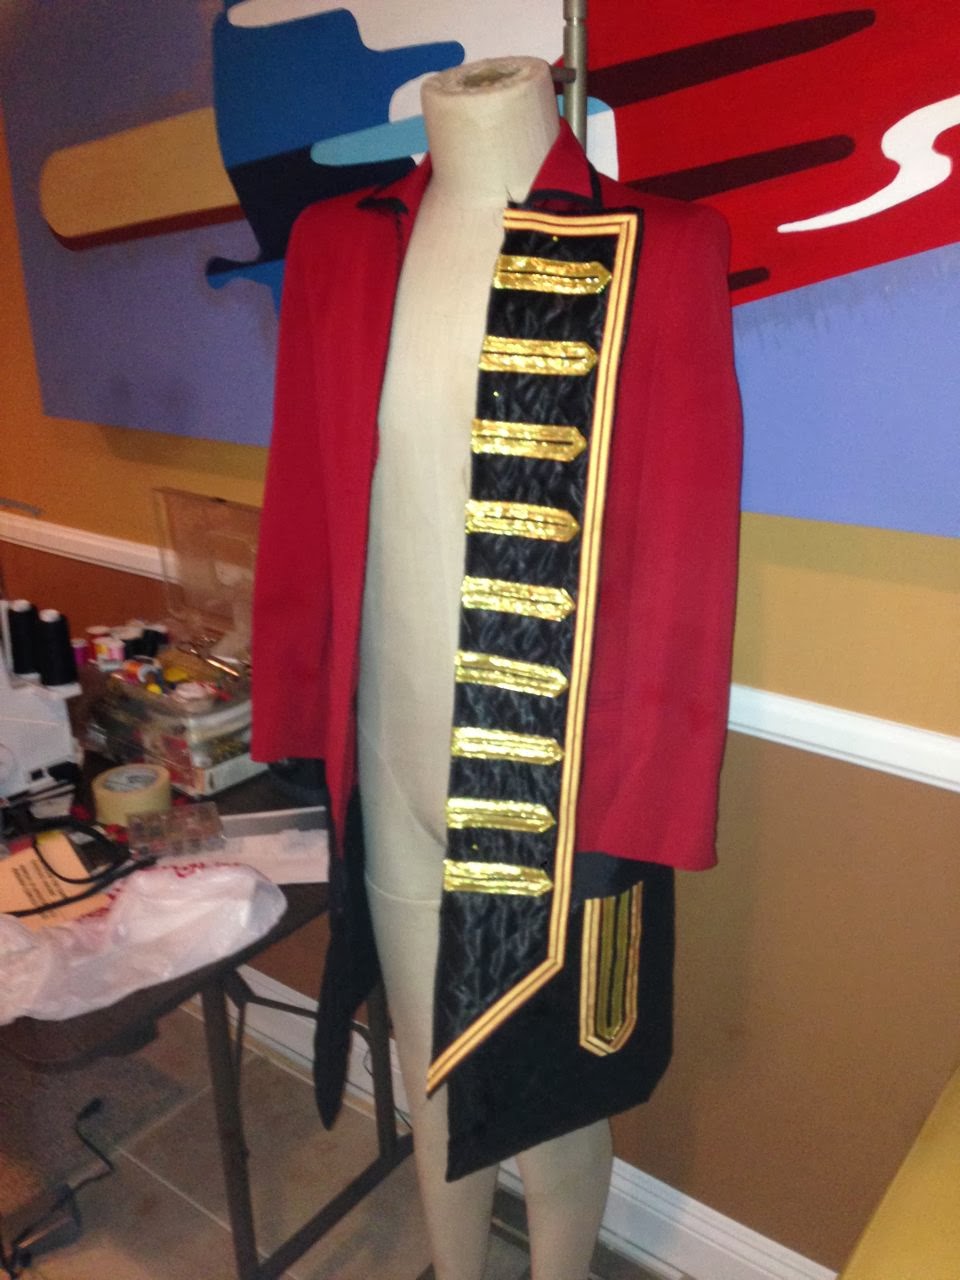
It's starting to look piratey!!!  Take buttons and sew the lapel to the jacket, tacking them at the end of each point.  Now it's time for cuffs.  Measure the inside of the sleeve and create trapezoids with the inside of the cuff measurement at the small part of the trapezoid widening 6 inches on the opposite edge.  


Sew the right edge of the fabric to the inside of the cuff, flap the fabric down and cuff it on top of itself.


I know that's a mouthful, but play with it and you'll get it.  


For a bit of tailoring, add a gather bar in the back.  This will slim the waist and give the bottom a fullness.

Well yo ho ho, you're a sexy pirate, or rum runner, or Red Coat, or extra from a high school production of 1776.  There is no limit to what these basics can create in period clothes.  Be creative, don't sew/glue your fingers together, and have fun.  


Friday, September 27, 2013

Painting at any skull level.

You can paint!  The great thing about Halloween is that things are supposed to be aged and imperfect and that gives you, yes you, a great chance to try your hand at something new.  Painting is a cheap way to make a large scale decoration in no time flat.  I found this 3'x2' canvas at a thrift store for 4 bucks.  I covered it in black and voila, I had a fresh medium.  Skulls are easy to paint, if you have a reference.  Go online and print out a simple skull, or put it on your Ipad if you are all fancy and stuff, and loosely sketch it on your canvas.  Then find an old wiry overused paint brush, this is where imperfection counts.  Dip it in your white paint and, start to wipe it off on a grocery sack or paper towel, you want to unload the paint off the brush so that you get whispy lines when you drag it across the canvas.  Then dive in!  Paint!  The great thing about using this dry brush technique is that if you make a mistake, it's a light one.  Start with the basic shape of the skull with your brush and build up the white in the areas you want to be the most prominent.  Dry brush is an easy playful way to paint that is hard to make a mistake with... just know when to stop.  You want some darker areas.  Imagine, bragging to your friends, I did that in 10 minutes... it feels, it feels, well it feels as great as I feel right now bragging to you.  Now, go get your art-attack on.  

Monday, September 23, 2013

Modified Weeping Angel


Want to make this?  Of course you do, and I am going to tell you how with my first video "Howl To!"  This is my modified Weeping Angel inspired by the characters from Dr. Who.  Yes she has no wings... yet.  But she will still scare away prowlers and any small children in your neighborhood, so get to watchin' and buildin'.


Thursday, October 11, 2012

Cemetery, no dumping!

I was looking for a fun addition to my tombstones as well as a way to hide the floodlights that shine on them and decided a sign could do both.  The sign essentially is built as a box with 1x4s and luan.  The depth will give the lights something to rest in.  


Now the tough part, lettering.  In the tombstone tutorial I painted names by masking off a word with stick-on letters, painting over them, picking off the stick-on letters, and letting the undercoat show through.  With the signs, I did a more traditional masking.  I printed the name on several sheets of paper and taped them together into a banner.  Then it's time to XACTO cut them out.  Choose a font with lots of straight lines and use a straight edge to cut, that will make this tedious process easier.  Then spray your stencil with spray mount and let it dry for about a minute.  You want the stencil to be tacky so that it stays down but doesn't permanently adhere to the paint.  


As adhered as I thought the stencil was, I still had overspray issues and soft edges (you really have to press the stencil down.)  Sadly enough, the green I had used was spray paint so I couldn't easily touch it up.  The solution: I used a little black paint and a brush to paint in wherever I had oversprayed, and the looks was so cool I continued applying black with a brush and sea sponge until the entire sign looked weathered and dirty.  


Damn vandals!  I had to put a little humor into the sign, and yes, every drip was intentional. I will have more pictures of the entire set up after this weekend.  And if you need to paint words on anything, try this easy technique or cutting out a stencil and using a little spray adhesive to hold it on.  The professional results you can get are pretty amazing.  


Monday, October 8, 2012

Feeling Busty?


Okay, now I understand most people don't have busts just sitting around their home... but I am not most people.  And at the Casa De Horrorble we had an Elvis bust sitting around. It was interesting but not very spooky.  So I remember something the used to do at my church when I was growing up during Lent: they covered all the crucifixes with purple cloth and it gave them a slightly eerie quality.  I added some purple lace and rope to Elvis and now he quietly peers out at people from my dining table.    So in my opinion, if ya have something cool that is a little too cheery, try tying black or purple lace or tulle over it and see what it does.  You might be surprised.     

Thursday, October 4, 2012

My Ghastly Family


Every family has a few skeletons in their closet... and mine looks like they might have an arm and a leg too.  This is such a cheap and classy way to get into the Halloween spirit.  Search thrift stores for interesting frames.  Don't worry if there is art in it, you can always cut open the back and pop it out.  To give them a regal antique look, spray them gold and then lightly dust them with black.
The three main pictures in this collage are of me and my roommates.  There are tons of youtube tutorials on how you can use photoshop to age and add some scare value to portraits.  My suggestion is to find an antique photograph online, put the person's head on the period clothing, add some dark circles over the eyes, and add layers of grunge filters and brushes on top of them.  If you aren't looking to personalize it, there are plenty of spooky antique portraits you can google, print out, and frame.  

A VERY BAD THING
Some of my prize pictures are lenticular changing photos.  You probably have seen some of these in halloween stores.  My favorite, however, come from a site called Haunted Memories.  They are more expensive than the ones you will find in Kmart, but the artist Edward Allen does some truly amazing work.  Here is a little video of some of my favorites.


Saturday, September 29, 2012

Shady leer

Okay, I know this blog is supposed to share how-to's, and to be honest I just lucked into this chandelier.  A theater space tried to spray paint two crystal chandelier's black and sort of gummed them up.  They were going to throw them away when a friend swooped in and got them for me.  I re-rigged them with flicker bulbs [which you can get in large quantities for cheap on ebay] and hung it in the entryway.  I guess the lesson here is, let people know you are looking for halloween decor and you will be surprised how many people will find it for you.