Thursday, October 11, 2012

Cemetery, no dumping!

I was looking for a fun addition to my tombstones as well as a way to hide the floodlights that shine on them and decided a sign could do both.  The sign essentially is built as a box with 1x4s and luan.  The depth will give the lights something to rest in.  


Now the tough part, lettering.  In the tombstone tutorial I painted names by masking off a word with stick-on letters, painting over them, picking off the stick-on letters, and letting the undercoat show through.  With the signs, I did a more traditional masking.  I printed the name on several sheets of paper and taped them together into a banner.  Then it's time to XACTO cut them out.  Choose a font with lots of straight lines and use a straight edge to cut, that will make this tedious process easier.  Then spray your stencil with spray mount and let it dry for about a minute.  You want the stencil to be tacky so that it stays down but doesn't permanently adhere to the paint.  


As adhered as I thought the stencil was, I still had overspray issues and soft edges (you really have to press the stencil down.)  Sadly enough, the green I had used was spray paint so I couldn't easily touch it up.  The solution: I used a little black paint and a brush to paint in wherever I had oversprayed, and the looks was so cool I continued applying black with a brush and sea sponge until the entire sign looked weathered and dirty.  


Damn vandals!  I had to put a little humor into the sign, and yes, every drip was intentional. I will have more pictures of the entire set up after this weekend.  And if you need to paint words on anything, try this easy technique or cutting out a stencil and using a little spray adhesive to hold it on.  The professional results you can get are pretty amazing.  


Monday, October 8, 2012

Feeling Busty?


Okay, now I understand most people don't have busts just sitting around their home... but I am not most people.  And at the Casa De Horrorble we had an Elvis bust sitting around. It was interesting but not very spooky.  So I remember something the used to do at my church when I was growing up during Lent: they covered all the crucifixes with purple cloth and it gave them a slightly eerie quality.  I added some purple lace and rope to Elvis and now he quietly peers out at people from my dining table.    So in my opinion, if ya have something cool that is a little too cheery, try tying black or purple lace or tulle over it and see what it does.  You might be surprised.     

Thursday, October 4, 2012

My Ghastly Family


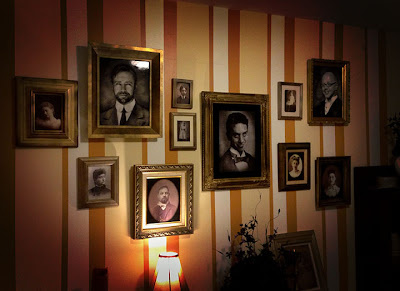
Every family has a few skeletons in their closet... and mine looks like they might have an arm and a leg too.  This is such a cheap and classy way to get into the Halloween spirit.  Search thrift stores for interesting frames.  Don't worry if there is art in it, you can always cut open the back and pop it out.  To give them a regal antique look, spray them gold and then lightly dust them with black.
The three main pictures in this collage are of me and my roommates.  There are tons of youtube tutorials on how you can use photoshop to age and add some scare value to portraits.  My suggestion is to find an antique photograph online, put the person's head on the period clothing, add some dark circles over the eyes, and add layers of grunge filters and brushes on top of them.  If you aren't looking to personalize it, there are plenty of spooky antique portraits you can google, print out, and frame.  

A VERY BAD THING
Some of my prize pictures are lenticular changing photos.  You probably have seen some of these in halloween stores.  My favorite, however, come from a site called Haunted Memories.  They are more expensive than the ones you will find in Kmart, but the artist Edward Allen does some truly amazing work.  Here is a little video of some of my favorites.